Popup
Toolkit Getting Started Tutorial
Welcome
to this short tutorial. It is provided to you in order to help you get started
using Popup Toolkit in just minutes - only 2 or 3 minutes.
When
you first open Popup Toolkit you will see that it’s very easy to use it. First
thing to do is to hit the 'Preview' button in the lower left of the user
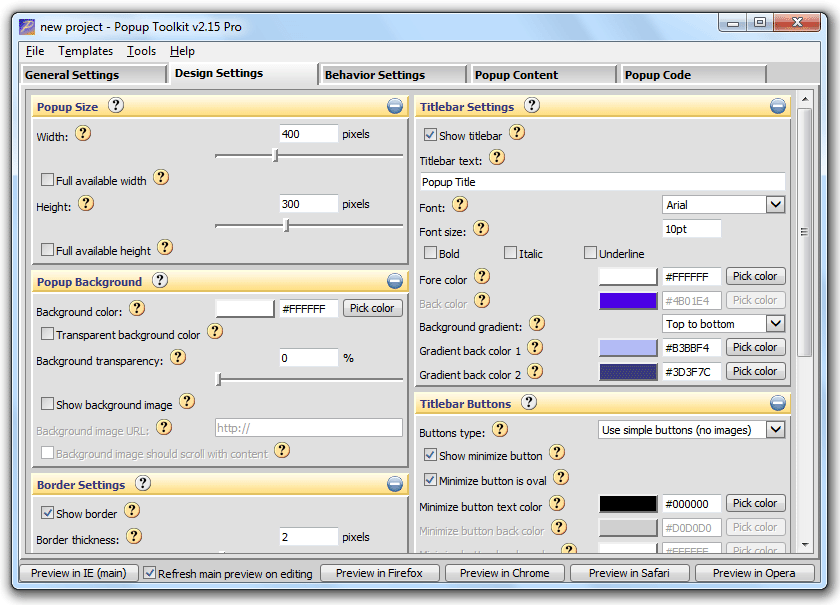
interface (see Figure 1 below). This will open the Instant Preview window where
you can see the current popup. Then play around with the interface for a minute
or two changing things - if the 'Refresh main preview on editing' checkbox is
checked you will see instant changes to the looks and content of your popup in
the preview window while editing (but WITHOUT effects). You may also hit the
'Preview' button again anytime to see the current result of your editing (WITH
effects). Thus you'll quickly feel how it works.
Let's get started now...

|
|
|
Basics
Using the 'File' menu - top-left of
the user interface (see Figure 1 above) you may create a new popup
project or load existing projects that you've created before or from the examples
directory "C:\Program Files\Popup Toolkit v2\examples".
Context
Sensitive Help
Next to each control in the interface there is a The
Popup Project User Interface
Popup Toolkit user interface displays 5 screens or tabs (see Figure 1 above). Click on
the tabs to choose which screen to work with. Each screen encompasses settings
for a different aspect of the popup attributes, behavior, content or looks. Once the
popup has been designed to your satisfaction, click the 'Popup Code' tab to
install the popup on your web page(s). Instant
Preview Buttons There are five instant Preview
buttons in the lower part of the interface (see Figure 1 above). The 'Preview in IE (main)' button is on
the left. Click this button to open the main preview window. Check the 'Refresh main preview on editing'
checkbox to have the main preview window refresh on each change you make to your popup.
Click the 'Preview in Firefox' or any other preview button to preview in the selected
web browser (you need to have that web browser installed).
This way you can see how the popup will look and behave in different browsers.
The
'General Settings' Screen
In the 'General Settings' tab (Figure 1 above) you may specify the popup type, popup triggering mode and
how often to show the popup (cookies settings).
The
'Design Settings' Screen
In this screen you can edit various aspects of the popup design looks
such as popup size, background, border, shadow, titlebar and its buttons,
scrollbars and so on.
The
'Behavior Settings' Screen
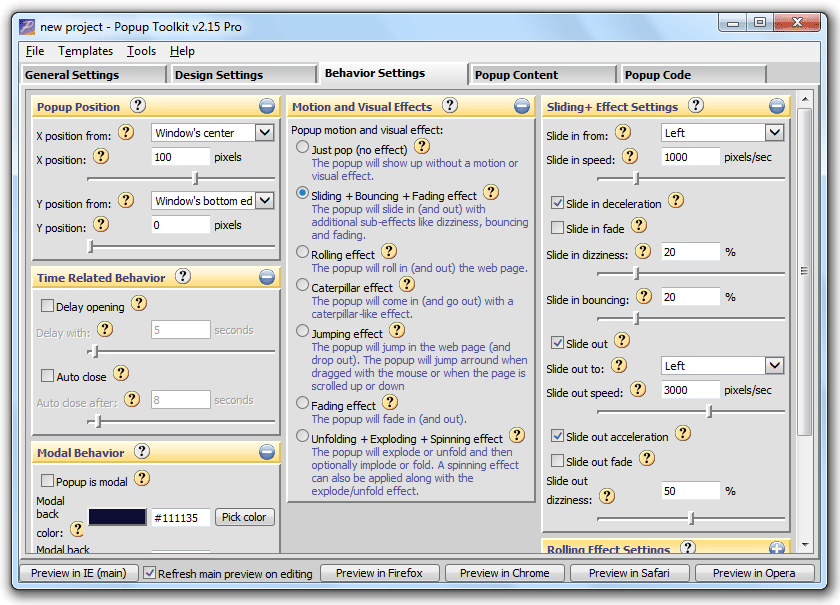
Here are the popup behaviors controls. You may setup popup position,
time related behaviors, mouse related behaviors, modal mask, choose
between 7 different effects and also select plenty of setting for each
effect. There are effects with a number of sub-effects.
The
'Popup Content' Screen
In the 'Popup Content' tab you may enter popup content in a number of ways.
Select the content type (internal or external) and use the WYSIWYG editor
or enter a URL. Choose from four different content loading modes. You may
place additional objects in the internal content such as close button,
close link, countdown timer, instant mail send buttons and so on.
The
'Popup Code' Screen
The 'Popup Code' screen lets you install the code of your popup in a web
page file of your choice. Select a web page file from your hard disk,
choose method of installation ('Install the code in an external JS file'
is recommended method). Click the 'Install the popup code into the web
page file' button and upload the webpage file and the created JS file to
your web server. The created JS file is located in the same directory as
your web page file. Before uploading, it is recommended to test your webpage
file from your hard disk to see how the popup is working.
Default
Settings (New Project Settings) You can easily change the
default settings in Popup Toolkit. Just select all the options you want by
default and then save the file as 'default-popup.pws' in the Popup Toolkit
program folder which is usually located here: 'C:\Program Files\Popup Toolkit
v2'. This was Popup Toolkit in a
nutshell!
For further details on specific features and effects, refer to the
User's Manual
Finally, if you encounter any problem or need help, contact me
(see bottom of page for contacts).
Enjoy! icon. Click it and you will receive instant help on this particular element of
the interface. You may hide or later show these help icons from the
'Tools/Options' menu.


 or click on
  icons in the interface to get context sensitive help. You may
open different help topics and tutorials from the 'Help' menu in Popup Toolkit.